


What Is Tempering in Diablo 4?
Tempering is the crafting system that lets you add custom Affixes to Legendary and Rare gear. Unlike random loot drops, Tempering gives you control over specific stats that matter for your build. Available during both leveling and endgame, this system is essential for optimizing your character.
You might be wondering: When does Tempering become available? At level 15, you get an automatic priority quest that rewards your first Tempering Manual. Complete it at the Blacksmith in Kyovashad – there’s a treasure chest right next to him.
💡 Critical insight: Once you unlock Tempering on one character in your game state (Eternal, Seasonal, Hardcore), it becomes available at any level for all characters in that state. You don’t need to repeat the quest.
Tempering Categories and Gear Compatibility 📊
Tempers fall into six categories, each compatible with specific gear slots:
| Category | Compatible Gear Slots |
|---|---|
| Weapons | Weapons, Totems, Focus |
| Offensive | Amulets, Weapons, Totems, Focus, Gloves, Rings |
| Defensive | Chest Armor, Helms, Legs, Amulets, Shields |
| Utility | Chest Armor, Helms, Legs, Amulets, Gloves, Boots, Shields |
| Mobility | Boots, Amulets |
| Resource | Rings, Amulets |
⚠️ Critical rule: Once you choose a category for a gear piece, you’re locked into that category. You can reroll within it, but you cannot switch to a different category without resetting.
Which Items Can Be Tempered? ✓
Temperable:
- ✓ Rare items (1 reroll)
- ✓ Legendary items (2 rerolls)
- ✓ Legendary items with Greater Affixes (+1 reroll per Greater Affix, up to 7 total)
NOT Temperable:
- ❌ Magic items
- ❌ Unique items
- ❌ Mythic Unique items
Tempering Reroll System Explained 🎲
Each item quality gets different reroll amounts:
| Item Quality | Initial Roll | Rerolls Available | Total Attempts |
|---|---|---|---|
| Rare | 1 | +1 | 2 |
| Legendary | 1 | +2 | 3 |
| Legendary (Greater Affixes) | 1 | +2 to +7 | 3 to 8 |
💡 Pro tip: Each Greater Affix on a Legendary item grants +1 additional reroll. This means high-quality Legendary items with multiple Greater Affixes become significantly more valuable for Tempering.
Tempering Manuals – How to Find and Use 📖
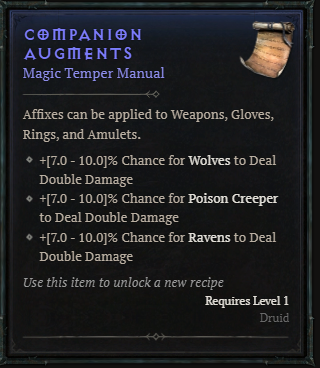
Tempering Manuals drop throughout the world and come in three tiers:
Manual Tiers
| Tier | Affix Quality | Notes |
|---|---|---|
| Magic | Lowest ranges | Early game |
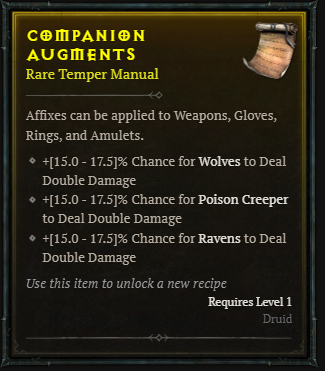
| Rare | Medium ranges | Mid progression |
| Legendary | Highest ranges | Endgame optimal |
Important: All tiers provide the same Affixes, but higher tiers have better value ranges. When you temper an item, it automatically uses your highest available tier.
Where to Farm Tempering Manuals
✓ Random drops from enemies
✓ Ladder Boss kills (high drop rate)
✓ Tree of Whispers caches
✓ World events
✓ Nightmare Dungeons
✓ Helltides
Viewing Your Learned Manuals
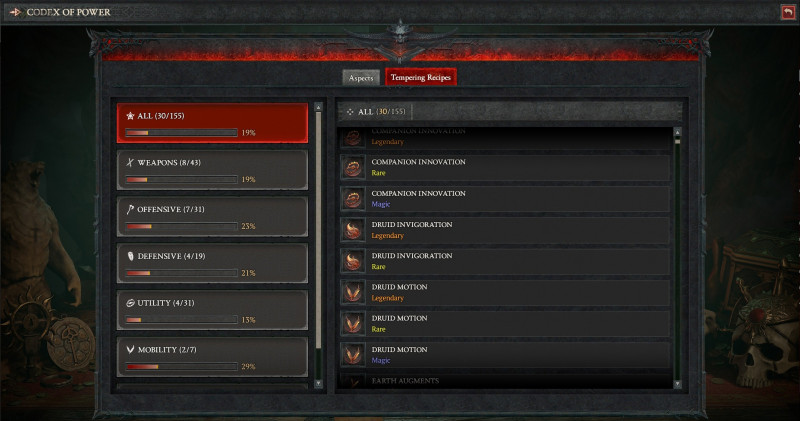
Press Ctrl+Y → Tempering Recipes tab in the Codex of Power. All learned manuals are stored here and are account-wide within your game state (Seasonal characters share, Eternal characters share separately).
Tempering Caps – Critical Limitations ⚠️
This is extremely important and where many players waste points. Certain Tempers have hard caps:
Hard Cap Rules
| Stat Type | Cap | Examples |
|---|---|---|
| Effect Size / Active Size | 100% | Skill area increases, companion sizes |
| Chance Procs | 100% | Double damage chance, skill proc twice, Crit/Lucky Hit |
| Attack Speed | 200% | All attack speed increases combined |
❌ Common mistake: Stacking multiple Active Size tempers thinking you’ll get 150%+ effectiveness. You won’t. Once you hit 100%, additional points are wasted.
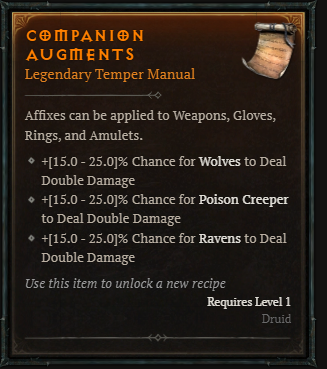
Example: Druid Companion Innovation
Using Companion Innovation to increase Raven Active Size (25-45% Legendary version):
- Apply 2 Active Size tempers = ~90-100% increase ✓
- Apply 3+ Active Size tempers = wasted points beyond 100% ❌
Even hitting near 100% is massive – Ravens become screen-filling monsters that clear entire packs instantly.
Tempering Costs and Materials 💰
Tempering requires materials, not gold. Costs remain the same for each reroll, making it consistent and predictable.
Required Materials (All Tempers)
✓ Veiled Crystal (always required)
✓ Forgotten Soul (Ancestral Legendary tier)
Additional Materials by Gear Type
| Gear Type | Low Tier Material | High Tier Material |
|---|---|---|
| Armor | Rawhide | Coiling Ward |
| Weapons | Iron Chunk | Baleful Fragment |
| Jewelry | Iron Chunk | Abstruse Sigil |
Exact Costs by Item Quality
Rare Items (750 item power):
- Armor: 25 Rawhide + 5 Veiled Crystal
- Weapons: 25 Iron Chunks + 5 Veiled Crystal
- Jewelry: 25 Iron Chunks + 5 Veiled Crystal
Legendary Items (750 item power):
- Armor: 15 Veiled Crystal + 5 Coiling Ward
- Weapons: 15 Veiled Crystal + 5 Baleful Fragment
- Jewelry: 15 Veiled Crystal + 5 Abstruse Sigils
Ancestral Legendary (800 item power):
- Armor: 25 Forgotten Souls + 25 Coiling Ward
- Weapons: 25 Forgotten Souls + 25 Baleful Fragments
- Jewelry: 25 Forgotten Souls + 25 Abstruse Sigils
💡 Pro tip: Tempering at low levels is incredibly cheap. If you get a decent Rare item while leveling, temper it immediately – the power spike is worth the minimal cost.
How to Apply Tempers – Step by Step 🔧
Step 1: Learn a Tempering Manual
When a Tempering Manual drops, right-click it to learn. It goes into your Codex of Power permanently.
Step 2: Visit the Blacksmith
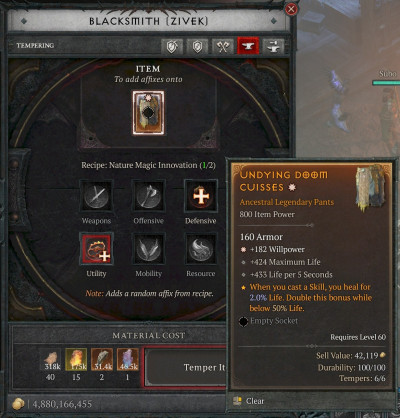
Go to any Blacksmith (Kyovashad recommended) and select the fourth tab (Tempering).
Step 3: Choose Your Item
Drop the item you want to temper into the Item slot. You’ll see:
- Available Recipe Categories for that item
- Material cost for applying the temper
Step 4: Select Category and Affix
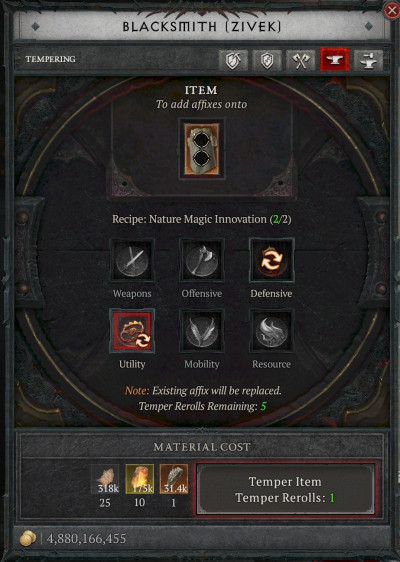
Click the category you want. Most items have 2 categories, but Amulets have 5 (though you can still only apply 2 total tempers).
Choose the specific Affix from the manual. Each has a randomized range – for example, 60-100 can hit any value in between.
Step 5: Roll or Reroll
Apply the temper. If you don’t like the roll, use your available rerolls to try again. You can:
- Reroll the same temper for a different value
- Choose a different temper within the same category
⚠️ Important: Rerolling the same temper doesn’t guarantee a higher value – it can roll lower.
How to Reset Tempering Charges 🔄
You can reset all Tempering charges on an item using Scroll of Restoration. This is crucial for experimenting with different tempers or fixing mistakes.
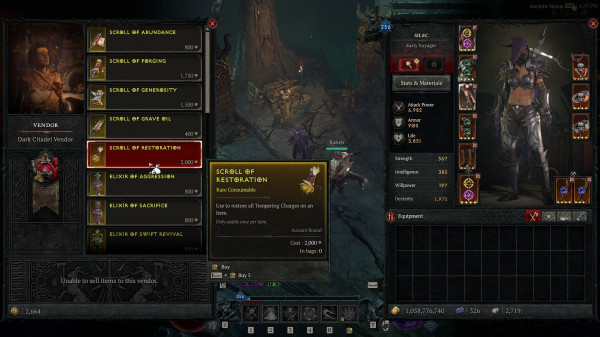
Where to Get Scroll of Restoration
✓ Infernal Hordes loot chests (after defeating waves)
✓ Dark Citadel drops
✓ Dark Citadel Vendor (purchase with Citadel Coins)
💡 Pro tip: Don’t waste Scrolls on low-quality items. Save them for Ancestral Legendary gear with multiple Greater Affixes where reroll potential matters most.
Tempering Strategy for Different Build Phases 🎯
Early Leveling (Level 15-50)
✓ Temper any Rare or Legendary that’s decent
✓ Focus on damage-increasing tempers
✓ Don’t overthink it – costs are minimal
✓ Replace frequently as you level
Early Endgame (Level 50-60, Torment 1-2)
✓ Start being selective about what you temper
✓ Prioritize weapons first (highest impact)
✓ Look for items with Greater Affixes for more rerolls
✓ Begin planning around build-specific tempers
Mid Endgame (Torment 3, Pit 40+)
✓ Only temper Ancestral Legendary items
✓ Focus on build-defining tempers from your guide
✓ Be mindful of tempering caps (100% effect size, etc.)
✓ Save Scrolls of Restoration for fixing mistakes
Late Endgame (Torment 4, Pit 55+)
✓ Temper only perfect or near-perfect base items
✓ Chase maximum roll ranges on critical tempers
✓ Coordinate tempers with Masterworking priorities
✓ Use Scrolls strategically to perfect each slot
Common Mistakes to Avoid ❌
❌ Tempering Unique or Mythic items (impossible)
❌ Exceeding 100% caps on effect size or chance procs
❌ Locking into the wrong category early without thinking
❌ Tempering low-quality items in endgame
❌ Not checking your build guide for mandatory tempers
❌ Wasting Scrolls of Restoration on replaceable gear
❌ Forgetting that rerolls can give lower values
❌ Not prioritizing weapons (they have highest impact)
FAQ
Q: Can I temper the same item multiple times?
A: Yes, each item can have 2 tempers (one per category), and you can reroll each one within its category.
Q: What happens when I run out of rerolls?
A: You’re stuck with whatever you rolled unless you use a Scroll of Restoration to reset charges.
Q: Can I change categories after choosing one?
A: No, unless you use a Scroll of Restoration to completely reset the item’s tempering.
Q: Do Tempering Manuals transfer between Seasonal and Eternal?
A: No, they’re separate. Seasonal manuals stay in Seasonal, Eternal in Eternal.
Q: What’s the best way to farm Tempering Manuals?
A: Kill Ladder Bosses and open Tree of Whispers caches. These have the highest drop rates.
Q: Should I temper while leveling or wait for endgame?
A: Temper while leveling. Costs are minimal and the power spike helps you progress faster.
Q: How do I know which tempers to use for my build?
A: Follow your specific build guide. Each build has mandatory tempers that make it work.
Q: Can I brick an item with bad tempering?
A: Not anymore – you always get something from your rolls. But you can waste rerolls and need a Scroll to fix it.